


Hemorrhage Control: How to Save a Life Before Help Arrives
You have 3 to 5 minutes. That's how long it takes for a severe arterial hemorrhage to cause irreversible damage or death. The average ambulance response time is 8 to 12 minutes — and in rural or remote areas, it can be far longer. That means whoever is on the scene is the real first responder. Knowing how to control a hemorrhage correctly can be the difference between someone living or dying — a stranger, a friend, someone you love.
4/11/20264 min read
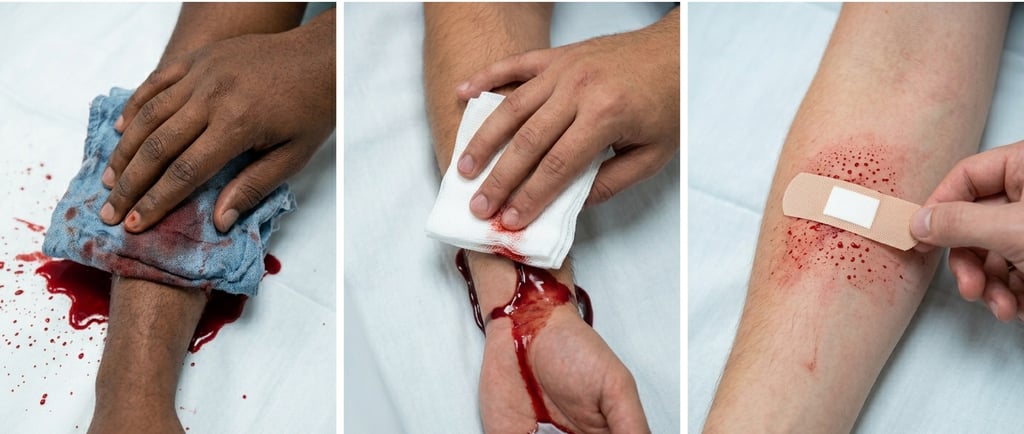
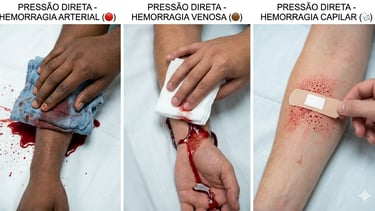
Understanding Types of Bleeding
🔴 Arterial Hemorrhage — MAXIMUM EMERGENCY Bright red blood spurting in rhythmic pulses (synchronized with the heartbeat). Most dangerous — massive blood volume loss within minutes. Requires immediate action.
🟤 Venous Hemorrhage — SERIOUS Dark red blood flowing continuously and steadily without pulsing. Less rapid than arterial but equally dangerous if uncontrolled.
🩺 Capillary Hemorrhage — LESS SERIOUS Superficial bleeding in small amounts. Usually stops on its own. Scrapes and shallow cuts.
Practical rule: if blood spurts forcefully or pulses, it's arterial — act within seconds.
TECHNIQUE 1 — Direct Pressure: Always the First Step
Direct pressure is always the first step in controlling any hemorrhage. Simple, effective and can be applied with any available material.
How to apply direct pressure correctly:
Protect yourself — use disposable gloves if available. If not, use plastic bags, folded fabric or the patient's own hands
Cover the wound with a dressing, clean cloth, folded shirt or any available fabric
Press firmly — use your body weight, not just hand strength
Do not release or remove the dressing — if it soaks through, add more material ON TOP. Removing the dressing destroys the clot forming underneath
Maintain pressure for at least 10 minutes without interruption — do not peek at the wound
Elevate the limb above heart level if possible — reduces blood flow
Most common fatal mistake: releasing pressure to check if bleeding stopped. Do not do this. Hold for 10 full continuous minutes.
TECHNIQUE 2 — Pressure Bandage
When you need to free your hands or move the patient, a well-applied pressure bandage maintains continuous pressure.
How to improvise:
Place a bulky pad directly over the wound (folded clothing, cloth, bandana)
Wrap firmly with a bandage, belt, tie, strips of fabric or any long, sturdy material
Tie the knot or lock directly over the pad, not to the side
Periodically check that the limb below still has circulation (colour, temperature, pulse)
TECHNIQUE 3 — Tourniquet: When and How to Use It
A tourniquet saves lives — but is frequently misapplied due to hesitation or wrong technique. Use it when:
✅ The hemorrhage is in a limb (arm or leg)
✅ Direct pressure is not controlling the bleeding
✅ The wound is too large for manual pressure
✅ The situation prevents continuous pressure (multiple casualties, combat, rescue)
How to apply a tourniquet correctly:
Position: apply 5 to 7 cm ABOVE the wound (never over a joint — knee, elbow)
Material: commercial tourniquet (CAT, SOFTT-W) is ideal — but a wide belt, tie or 4–5 cm fabric strip works
Minimum width: never use thin cord, wire or rope — they cut skin and damage nerves without stopping blood flow
Tighten until bleeding stops completely — it should be painful. If bleeding continues, tighten further
Secure with a knot and windlass (pen, branch, scissors) and lock so it doesn't release
Mark the application time visibly — write on the victim's forehead, on the tourniquet itself or on paper: "TQ — 14:32"
Never remove in the field — only healthcare professionals in a hospital setting
Dangerous myth: "the tourniquet will amputate the arm." False. Properly applied tourniquets for up to 2 hours rarely cause permanent damage. Uncontrolled hemorrhage kills in minutes.
🎥 Watch: How to correctly apply a tourniquet:

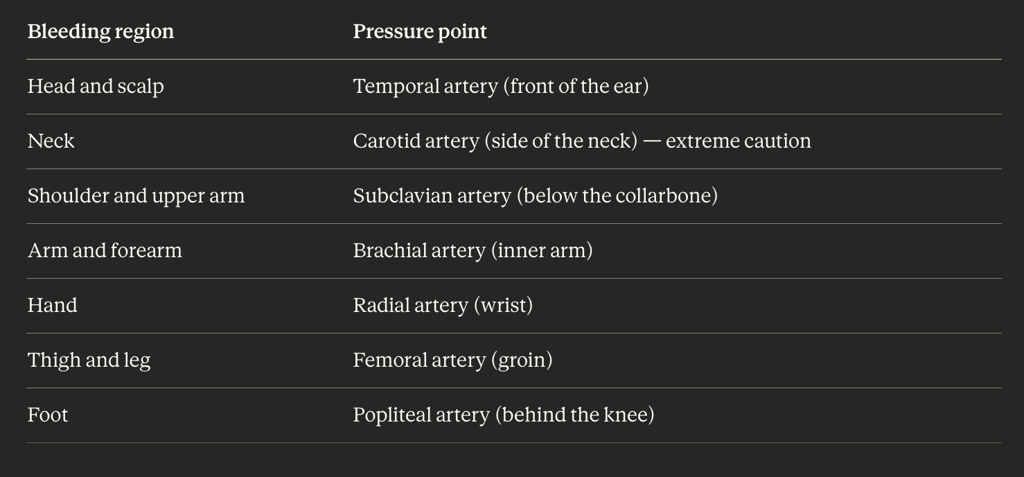
TECHNIQUE 4 — Pressure Points
Pressure points are locations where major arteries pass close to the surface over bone. Compressing them reduces distal blood flow and helps control bleeding while other techniques are being prepared.
TECHNIQUE 5 — Wound Packing
For deep wounds and cavities (armpit, groin, neck) where a tourniquet cannot be applied.
How to pack a wound:
Use hemostatic gauze (if available) or clean cloth
Push the material directly inside the wound with your fingers — do not just cover it from outside
Pack firmly until the entire cavity is filled
Apply firm, continuous pressure with your palm for 3 to 5 minutes
Maintain the packing and add external material for additional pressure
Chitosan gauze or hemostatic agents (like QuikClot) can be carried in your first aid kit and dramatically reduce clotting time.
Special Hemorrhage Situations
Internal Hemorrhage
No visible blood, but the signs are clear: cold, pale and clammy skin; weak and rapid pulse; mental confusion and agitation; rigid or distended abdomen; rapid blood pressure drop.
What to do: lay the victim flat with legs elevated (shock position), keep warm and call emergency services immediately. There is no effective field technique for internal hemorrhage — urgent transport is the only solution.
Nosebleed (Epistaxis)
Seat the victim slightly leaning forward (not backward — prevents swallowing blood)
Pinch both nostrils for 10 continuous minutes
Apply a cold compress to the back of the neck
If bleeding doesn't stop in 20 minutes, seek medical care
Bleeding from Ear or Eye After Trauma
May indicate a skull fracture — do not pack and do not apply pressure. Cover lightly with a sterile dressing and transport urgently.
Minimum Hemorrhage Control Kit
Every first aid kit should include:
CAT or SOFTT-W tourniquet
Hemostatic gauze (QuikClot or Combat Gauze)
Elastic compression bandages (Israeli Bandage)
Nitrile disposable gloves
Trauma scissors (cuts clothing and belts)
Permanent marker (to mark tourniquet time)
🎥 Watch: Trauma first aid kit

MARCH Protocol — The Military Trauma Standard
Used by military and paramedics worldwide, MARCH is the most efficient protocol for managing multiple problems in a trauma victim:
M — Massive Hemorrhage → immediate control
A — Airway → verify it's clear
R — Respiration → check and treat pneumothorax
C — Circulation → treat shock, IV access if possible
H — Hypothermia → keep the victim warm
Golden Rules for Hemorrhage Control
Act immediately — every minute counts
Direct pressure first, always
Never remove the tourniquet in the field
Mark the time of any intervention
Call for help while you act — don't wait to call
Keep the victim warm — hypothermia worsens bleeding
🩸 You don't need to be a doctor to save a life. You need knowledge and the courage to act. Share this article — it could make the difference at exactly the right moment.
Contact
Contact us for questions or suggestions.
© 2025. All rights reserved.
suportedoisb@gmail.com