


Build a Safe Shelter: Practical Advice for Survival
Imagine trekking through a dense forest when a sudden storm leaves you stranded. You possess no modern gear, only your wits and the natural resources around you. In moments like these, mastering wilderness survival becomes the difference between life and death. Constructing an effective survival shelter is your primary defense against harsh elements. Many people underestimate the physical toll of exposure until they face it firsthand. Relying on proven shelter building techniques allows you to maintain core body temperature when nature turns unforgiving.
3/29/202614 min read
Whether you are dealing with freezing rain or scorching heat, the right structure provides essential protection. Learning these skills ensures you remain calm and prepared during unexpected emergencies. Let us explore the fundamental methods required to stay protected in the wild.
Key Takeaways
Prioritize insulation from the ground to prevent heat loss.
Select a location that avoids natural hazards like falling branches.
Use natural debris to create a waterproof roof for your structure.
Keep your living space small to maximize body heat retention.
Practice these essential skills before you ever head into the backcountry.
The Reality of Survival: A Scenario Without Tools
The harsh truth of survival is that sometimes, you're left with nothing but your bare hands to build a safe haven. This reality is stark and unforgiving, yet it's a scenario that many adventurers and survivalists prepare for.
The story of Aron Ralston, who was trapped in a canyon and had to amputate his own arm to escape, is a testament to the extreme measures people may have to take in survival situations. While not directly related to shelter construction, it highlights the importance of being prepared and having the right knowledge.
When faced with the task of building an emergency shelter without tools, individuals must rely on outdoor survival skills that have been passed down through generations. The ability to identify suitable materials, understand the principles of shelter construction, and execute the build is crucial.
It's not just about having a roof over your head; it's about creating a safe and relatively comfortable space that can protect you from the elements. The process begins with understanding your environment and the resources available to you.
This includes identifying natural shelters like caves or overhangs, or materials that can be used for building, such as branches, leaves, and snow. The key is to work with what nature provides, using techniques that have been proven effective over time.
How to Build a Safe Shelter: Assessing Your Environment
Before you start building a shelter, it's essential to assess your surroundings for potential hazards. This step is crucial in outdoor survival skills as it directly impacts the safety and effectiveness of your shelter. Assessing your environment involves identifying natural hazards and selecting an ideal location for your shelter.
Identifying Natural Hazards and Risks
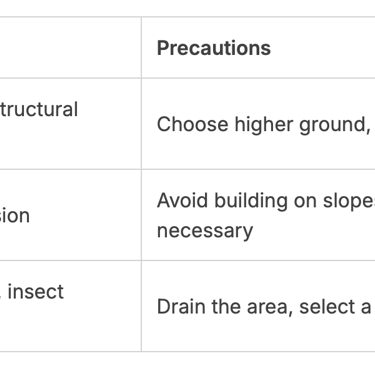
When assessing your environment, the first thing to do is identify any natural hazards. These can include flood-prone areas, steep slopes, and wildlife habitats. Being aware of these risks can help you avoid building your shelter in a dangerous location.
For instance, areas with loose rocks or hanging branches can be hazardous, especially during bad weather. It's also important to check for signs of recent flooding or land movement.
Selecting the Ideal Location
Once you've identified potential hazards, the next step is to select a location that is safe and suitable for building a shelter. This involves evaluating several factors.
Evaluating Terrain and Drainage
The terrain and drainage of an area are critical factors in shelter building. You should look for a spot that is not prone to waterlogging or flooding.
A slight incline can be beneficial as it allows water to drain away from your shelter. Avoid low-lying areas or places where water tends to collect. Proper drainage is key to keeping your shelter dry.

Another important consideration is the wind direction and exposure. Building your shelter in a way that protects it from harsh winds can make a significant difference in its effectiveness.
Consider the direction of prevailing winds and try to position your shelter so that it is shielded from these winds. Natural barriers like hills or dense vegetation can provide additional protection.
Gathering Materials Without Modern Tools
Survival in the wild requires resourcefulness, especially when it comes to gathering materials without modern tools. In a wilderness survival scenario, the ability to construct a shelter is crucial for protection against the elements. The process begins with gathering the necessary materials, which can be achieved through careful observation and manual labor.
The environment around you is a treasure trove of materials needed for shelter construction. Trees, branches, leaves, and other natural resources can be utilized to build a sturdy shelter. It's essential to identify the types of materials available and assess their suitability for the task at hand.
Sourcing Structural Supports
Structural supports are the backbone of any shelter, providing the framework that holds the structure together. In the wilderness, trees and branches can serve as excellent structural supports. Look for sturdy branches or saplings that can be used as poles. The ideal materials are straight, sturdy, and have a diameter that can support the weight of the shelter.
To source structural supports without modern tools, you can use techniques such as breaking or cutting branches using manual methods. For instance, you can use rocks or bones to cut or shape the branches to the desired length and shape.
Collecting Insulation and Roofing Materials
Insulation and roofing materials are critical for maintaining a dry and warm interior within the shelter. Leaves, grasses, and pine needles can be used as insulation, while larger leaves or pieces of bark can serve as roofing materials. The key is to collect materials that are waterproof and can provide adequate insulation against the cold.
When collecting insulation and roofing materials, it's essential to gather a substantial amount to ensure the shelter is well-insulated and protected from the elements. You can use your hands or simple tools made from natural materials to collect and prepare these resources.
By understanding how to gather materials without modern tools, you can significantly enhance your chances of survival in the wilderness. The right materials, combined with the knowledge of how to use them, can make all the difference in constructing a safe and reliable shelter.
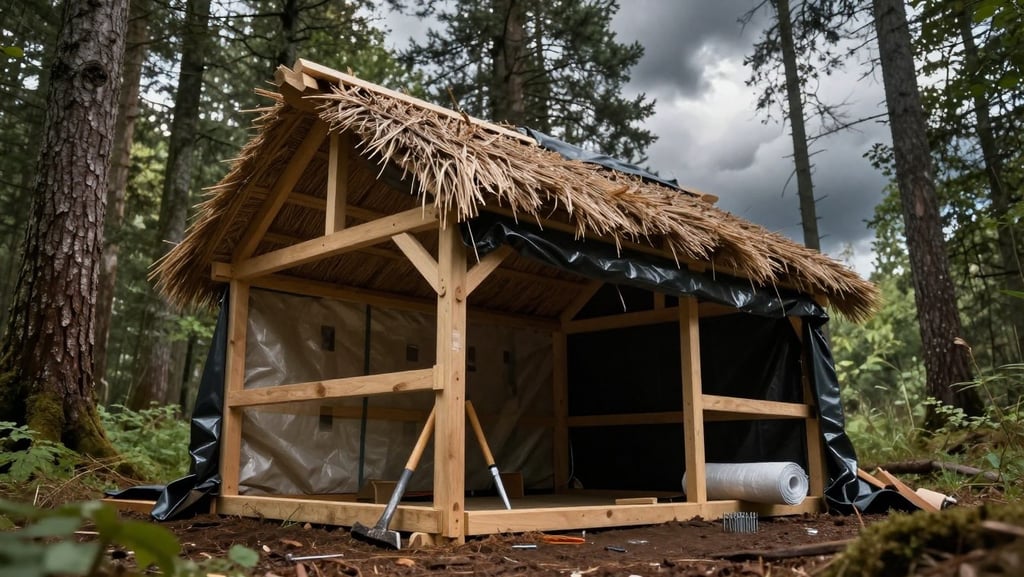
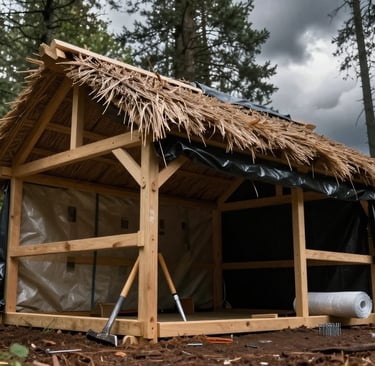
Step One: Establishing a Sturdy Framework
To build a shelter that can withstand various environmental conditions, start by establishing a sturdy framework. This foundational step is crucial for ensuring the overall stability and durability of your shelter.
Creating a Lean-To Structure
A lean-to structure is one of the simplest forms of shelter and can be constructed using minimal materials. To create a lean-to, you'll need a long, sturdy branch or pole (the ridgepole) and several smaller branches or sticks.
Find a suitable location with a natural lean-to feature, such as a fallen tree or a rocky outcropping.
Place the ridgepole against the feature, ensuring it's securely positioned.
Lean smaller branches against the ridgepole, creating a slope to allow water to run off.
Cover the structure with leaves, grasses, or other materials to provide insulation.
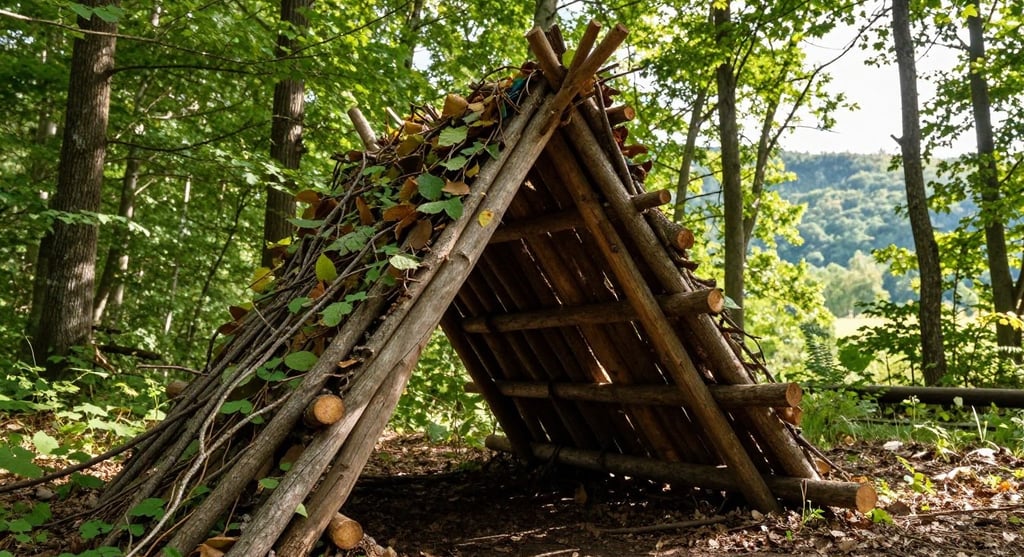
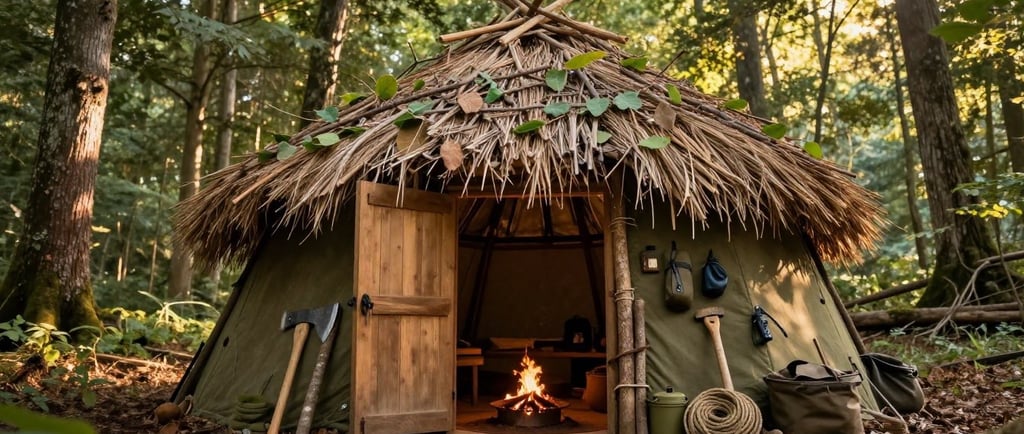
Building an A-Frame Debris Hut
An A-frame debris hut offers more protection than a lean-to and can be built using similar materials. The key to a successful A-frame is in its sturdy framework.
Start by creating a tripod structure using three sturdy branches. This will form the base of your A-frame.
Place additional branches across the tripod, weaving them together to create a robust frame.
Cover the frame with a thick layer of debris (leaves, branches, etc.), ensuring that the structure is well-insulated.
Finally, add a layer of material that sheds water, such as large leaves or a tarp, to protect the hut from the elements.
By following these steps, you can establish a sturdy framework for your shelter, whether you choose a lean-to or an A-frame debris hut. This will provide a solid foundation for further construction and ensure your shelter is safe and reliable.
Step Two: Mastering the Art of Insulation
To build a shelter that truly safeguards you, mastering insulation techniques is essential. Insulation plays a critical role in maintaining a warm and safe environment within your shelter.
Effective insulation ensures that your shelter remains warm in cold conditions and cool in hot conditions, making it a crucial aspect of shelter construction. It involves more than just keeping the cold out; it's about creating a barrier that retains warmth and protects against the elements.
Ground Bed Importance
A well-insulated ground bed is vital for thermal retention. The ground can suck the heat out of your body, making you colder. To prevent this, you need to create a barrier between you and the ground.
Gather a thick layer of leaves, grasses, or pine needles.
Spread the material evenly across the floor of your shelter.
Ensure the layer is thick enough to provide adequate insulation.
Layering Debris for Thermal Retention
Layering debris effectively is key to achieving good thermal retention. This involves creating multiple layers of material around your shelter to reduce heat loss.
Start with a base layer of sturdy branches or logs.
Add a layer of smaller twigs and branches.
Finish with a layer of leaves, grasses, or other insulating materials.
By mastering these insulation techniques, you can significantly enhance the warmth and safety of your shelter, making it a more effective haven against harsh weather conditions.
Step Three: Weatherproofing Your Shelter
Once you've established a sturdy framework for your shelter, the next crucial step is to weatherproof it. Weatherproofing is essential to protect your shelter from rain, wind, and other environmental factors that could compromise its integrity.
Shingling Techniques for Water Shedding
To effectively shed water, you'll need to apply a shingling technique to your shelter's roof. This involves layering materials such as leaves, grasses, or bark in an overlapping pattern to prevent water from seeping through.
Start from the bottom edge of the roof and work your way up, ensuring that each layer overlaps the one below it. This technique not only sheds water but also helps in reducing wind damage.
For optimal results, use materials that are readily available in your environment and are known for their water-resistant properties. For instance, large leaves or thick layers of pine needles can be very effective. It's also crucial to ensure that the shingles are tightly secured to prevent them from being dislodged by wind.
Reinforcing Against High Winds
High winds can be devastating to a shelter, especially if it's not properly reinforced. To counter this, you can use additional structural elements to secure your shelter.
One effective method is to use ropes or vines to tie the framework of your shelter to nearby trees or sturdy objects. This will help to anchor the shelter and prevent it from being lifted or shifted by strong winds.
Another technique is to add weight to the roof of your shelter. This can be achieved by placing heavy branches, rocks, or soil on top of the roofing material. The added weight will help to keep the roof in place during windy conditions. However, be cautious not to overdo it, as excessive weight can cause the structure to collapse.
By implementing these weatherproofing techniques, you can significantly enhance the durability and safety of your shelter, making it a reliable haven in adverse weather conditions.
Step Four: Managing Ventilation and Fire Safety
Managing ventilation and fire safety is the fourth crucial step in building a safe and habitable shelter. Ensuring that your shelter has proper airflow and a safely positioned fire pit can be the difference between a safe haven and a hazardous environment.
Positioning the Fire Pit Safely
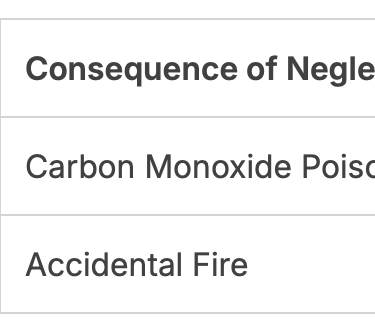
When it comes to having a fire inside your shelter, safety should be your top priority. The fire pit should be positioned in a way that it is away from flammable materials and the entrance of the shelter to prevent smoke from entering the living space.
A safe distance between the fire pit and the shelter walls is essential. A general rule of thumb is to have at least 3 feet of clearance around the fire pit. This reduces the risk of accidental fires spreading to the shelter itself.
Ensuring Proper Airflow to Prevent Carbon Monoxide
Proper ventilation is critical to prevent the buildup of carbon monoxide, a colorless, odorless gas that can be deadly in enclosed spaces. Ensuring that your shelter has adequate airflow involves creating vents or openings that allow fresh air to enter and stale air to exit.
A simple and effective way to achieve this is by creating a ventilation hole at a high point in the shelter, such as the roof. This allows warm air and gases to escape, making way for fresher air to circulate inside.

By prioritizing ventilation and fire safety, you can significantly reduce the risks associated with shelter living, creating a safer and healthier environment.
Common Mistakes to Avoid During Construction
Understanding the common mistakes made during shelter construction is key to building a safe and durable structure. When venturing into the wilderness or facing a survival situation, being aware of these pitfalls can significantly enhance your chances of creating a reliable shelter.
Two of the most critical errors individuals make involve underestimating the need for ground insulation and choosing unstable building sites. These mistakes can lead to discomfort, health issues, and even safety risks.
Underestimating the Need for Ground Insulation
Ground insulation is crucial for maintaining a warm and dry shelter. Without it, the cold ground can drain the heat from your body, making your shelter less effective. Proper ground insulation involves using materials like leaves, grasses, or pine needles to create a barrier between you and the cold ground.
As noted by survival expert Ray Mears, "The ground is a significant source of heat loss. Ensuring you have adequate insulation is vital for maintaining warmth."
"The ground is a significant source of heat loss. Ensuring you have adequate insulation is vital for maintaining warmth."
Ray Mears
A simple way to achieve this is by gathering a thick layer of natural materials and layering them on the ground before setting up your bed. This practice not only enhances warmth but also helps in keeping the shelter dry.
Choosing Unstable Building Sites
Selecting a building site that is prone to natural hazards or is otherwise unstable can have disastrous consequences. Factors such as flood zones, landslide areas, and proximity to standing water should be carefully evaluated.
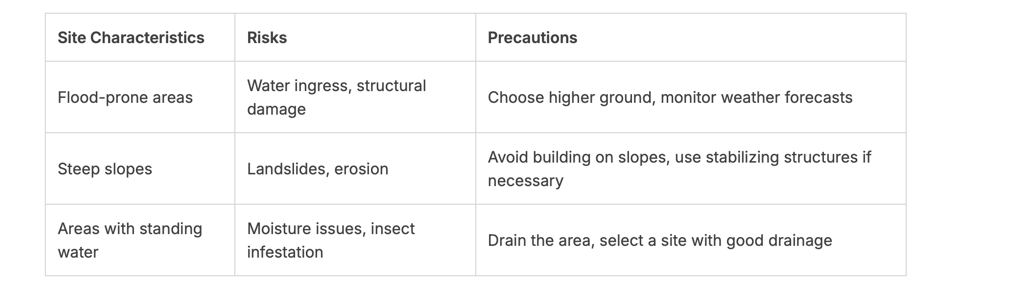
By being mindful of these factors and taking necessary precautions, you can significantly reduce the risks associated with your shelter.
In conclusion, avoiding common mistakes during shelter construction is pivotal for ensuring the safety and effectiveness of your shelter. By understanding the importance of ground insulation and carefully selecting your building site, you can build a shelter that provides adequate protection against the elements.
Psychological Resilience While Building Your Shelter
When faced with the task of building a shelter, psychological resilience plays a crucial role in determining success. The ability to stay focused and motivated under stress can significantly impact one's ability to construct a safe and effective shelter.
Building a shelter is a challenging task that requires not only physical effort but also mental toughness. Maintaining focus under stress is essential to overcome the obstacles that inevitably arise during the construction process.
Maintaining Focus Under Stress
To maintain focus, it's essential to break down the task into smaller, manageable goals. This helps in reducing the feeling of being overwhelmed and allows for a sense of accomplishment as each goal is achieved.
Here are some strategies to help maintain focus:
Set clear, achievable goals for each day.
Prioritize tasks based on importance and urgency.
Take regular breaks to avoid burnout.
The Importance of Small Wins
Celebrating small wins is vital for maintaining morale. Recognizing the completion of smaller tasks helps in building confidence and reinforces the motivation to continue working towards the larger goal.
A table summarizing the benefits of celebrating small wins is provided below:


In conclusion, psychological resilience is a critical factor in successfully building a shelter. By maintaining focus under stress and celebrating small wins, individuals can enhance their ability to cope with the challenges associated with shelter construction.
Conclusion
Building a safe shelter is a crucial survival skill that can be lifesaving in emergency situations. By assessing your environment, gathering materials, and constructing a sturdy framework, you can create a protective haven. A shelter building summary highlights the importance of selecting the ideal location, mastering insulation techniques, and weatherproofing your structure.
To increase your chances of survival, it's essential to practice survival shelter tips, such as layering debris for thermal retention and ensuring proper airflow to prevent carbon monoxide poisoning. By following these guidelines and avoiding common mistakes, you can build a reliable shelter that provides protection from the elements.
With practice and patience, you can develop the skills needed to build a safe and effective shelter. This knowledge will not only enhance your preparedness for emergencies but also boost your confidence in the face of uncertainty.
FAQ
What real-life scenario proves that building a shelter without tools is possible?
One of the most famous examples is the survival story of Juliane Koepcke, who survived a plane crash in the Peruvian rainforest. Without any survival gear or a Leatherman multi-tool, she had to find natural cover and navigate the jungle. Her experience highlights that understanding the environment and using available resources like large leaves and fallen limbs is vital when you lack modern equipment.
How do I choose the safest location for my shelter to avoid natural hazards?
You should always look for high, level ground to avoid flash floods or damp areas where moisture accumulates. Be sure to look up and check for "widow-makers"—dead branches or leaning trees that could fall in high winds. Ideally, you want a microclimate that offers a natural windbreak, such as a thicket of young evergreens, to help maintain your core temperature.
What are the best materials to use for a framework if I don't have a saw?
Look for "dead and down" wood that is still sturdy and hasn't started to rot. You can use the "V-notch" of a standing tree to snap longer branches to size using leverage. For binding, look for willow bark, spruce roots, or even long vines, which act as excellent natural cordage to secure your ridge pole without needing Paracord or duct tape.
Should I build a Lean-To or an A-Frame Debris Hut?
It depends on your needs! A Lean-To is excellent if you have a fire and a heat reflector, as it allows the warmth to reach you easily. However, an A-Frame Debris Hut is superior for retaining body heat. It acts like a natural sleeping bag; the smaller interior volume means your body doesn't have to work as hard to warm up the air around you.
Why do survival experts emphasize ground insulation so much?
As survivalist Les Stroud often points out, the cold ground will pull heat away from your body much faster than the air through conduction. Even if you are wearing a high-quality Patagonia fleece, laying directly on the earth can lead to hypothermia. You need a thick "mattress" of pine boughs, dry ferns, or leaves—at least six inches deep—to create a barrier between you and the cold soil.
How can I make my shelter waterproof using only forest debris?
The secret is in the shingling technique. Start placing your roofing materials—like large pieces of bark or thick bundles of pine needles—at the bottom of the structure and work your way up. This ensures that rainwater runs off the top layer and over the one below it, rather than leaking inside. If you happen to find any discarded plastic or Gore-Tex scraps, tuck them into the top layers for extra protection.
How do I manage a fire safely near my handmade shelter?
Fire safety is critical because a debris shelter is essentially a pile of kindling. Always place your fire pit at least three to five feet away from the entrance and clear away all flammable debris from the area. Ensure your shelter has a small opening at the highest point to allow for ventilation, which prevents carbon monoxide buildup and keeps the interior air fresh while the smoke rises away from you.
What is the most common mistake people make during construction?
The most frequent error is building the shelter too large. It is tempting to want a "roomy" space, but a survival shelter should be a snug "cocoon." If there is too much empty space, your body heat will dissipate. Remember the Rule of Threes and prioritize a compact design that you can realistically finish before the sun goes down.
How can I stay mentally focused when I am tired and stressed?
Psychological resilience is just as important as physical skills. Focus on "small wins," like finishing the ridge pole or gathering one pile of leaves at a time. This keeps your cortisol levels in check and prevents overwhelm. Experts like Ray Mears suggest that staying busy with purposeful tasks helps maintain a positive "survival mindset," which is often the deciding factor in an emergency.
READ ALSO:
What are the chances of another pandemic worse than COVID?Qual a chance de outra pandemia pior que a COVID?
The world still remembers the profound impact of COVID-19 on our daily lives. While we have moved forward, many experts now question if we are truly prepared for a future health crisis that could be even more severe. Concerns reached a new peak following the 2026 viral sample theft incident in São Paulo. This alarming event highlighted significant vulnerabilities in how we secure dangerous pathogens. It serves as a stark reminder that our collective safety depends on strict oversight and international cooperation.
No Water, No Power: Are You Ready?
Imagine waking up tomorrow with no running water and no electricity. No warning. No timeline for recovery. It sounds extreme—but in crises, it can happen fast. The real question is: are you ready to survive without water and power?
Contact
Contact us for questions or suggestions.
© 2025. All rights reserved.
suportedoisb@gmail.com