


🧭 Navigation Without GPS: How to Use Map, Compass and Nature to Never Get Lost
In 2013, an experienced hiker got lost in the Colorado mountains. He had GPS. He had a phone. He had every modern resource. But when the battery died, he couldn't read the terrain, didn't know the stars and had no idea which way he was walking. He was found 3 days later with severe hypothermia, less than 800 metres from a road. GPS fails. Batteries die. Signal disappears. And when that happens, the only thing that saves you is the knowledge in your head — not in your pocket. Keywords: navigation without GPS, how to use compass and map, wilderness orienteering, navigate by stars, how not to get lost in nature
BARBARA COSTA
4/28/20266 min read


🧭 PART 1 — The Compass: Understanding the Instrument
🔴 Anatomy of a Baseplate Compass
The most common and versatile type for map navigation:
Magnetic needle: the red end points to Magnetic North (not Geographic North — this difference matters)
Rotating bezel: the ring marked 0° to 360° that you turn to set directions
Orienting lines: parallel lines inside the bezel that align with the map
Direction of travel arrow: points where you will walk
Transparent baseplate: used over the map to measure and plot routes
Scale: lets you measure map distances
🌍 Magnetic North vs True North (Magnetic Declination)
The Magnetic North Pole is not in the same place as the Geographic North Pole. The angular difference between them is called magnetic declination and varies depending on where you are in the world.
In North America: ranges from -20° to +20° depending on region
In Europe: approximately -5° to +5°
In Australia: approximately +10° to +15° eastward
How to correct:
If declination is West (negative): add the value to the compass bearing
If East (positive): subtract
Modern topographic maps always show local declination in the legend
Practical rule: for short trips (under 5 km), declination has minimal impact. On long routes, ignoring it can put you kilometres off course.
🗺️ PART 2 — Reading a Topographic Map
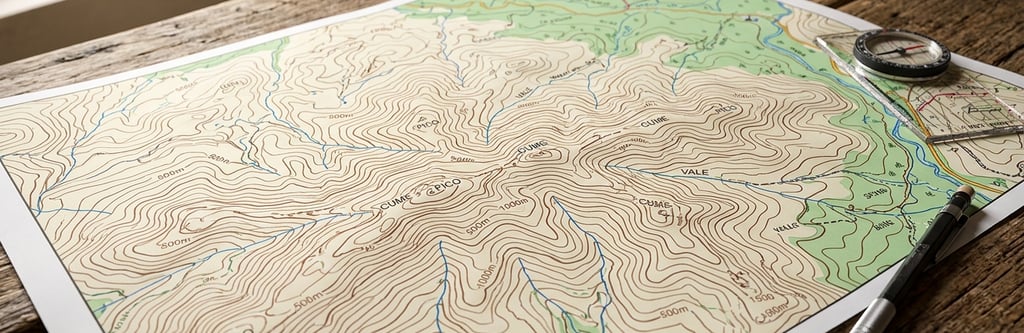
A topographic map is a three-dimensional representation of terrain in two-dimensional format. Reading it is like having a bird's eye view before you even arrive.
📏 Map Scale
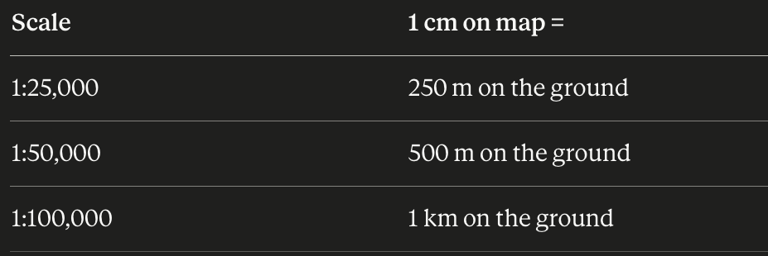
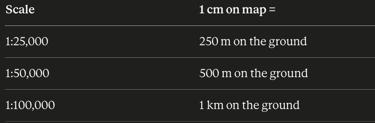
For trails and field orienteering: 1:25,000 is ideal — sufficient detail without being unwieldy.
🏔️ Contour Lines — The Language of Terrain
Contour lines represent points of equal elevation. Reading them means reading the landscape before seeing it.
Fundamental rules:
Lines close together = steep terrain (sharp slope, cliff)
Lines far apart = gentle terrain (plain, open valley)
V-shapes pointing uphill = valley / watercourse
V-shapes pointing downhill = ridge / spur
Closed circle = summit or depression (depressions have small tick marks pointing inward)
Contour interval: the elevation difference between two consecutive lines — typically 10m, 20m or 40m depending on scale and terrain.
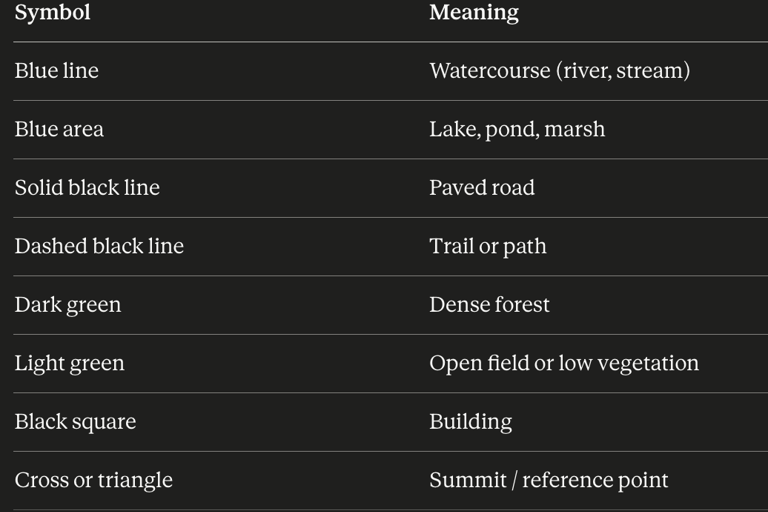
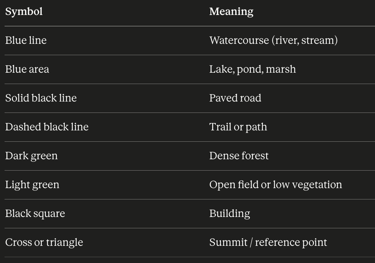
🔵 Essential Map Symbols
🎯 PART 3 — Using Compass and Map Together
📐 How to Take a Bearing from the Map and Follow It in the Field
The bearing is the angle in degrees between North and the direction to your destination. It is the universal language of navigation.
Step by step:
Orient the map: rotate it until the map's North-South lines align with true North (use the compass to find North)
Position the compass on the map: lay the baseplate edge connecting your current position to your destination
Rotate the bezel: turn it until the orienting lines inside align parallel to the map's North-South grid lines
Read the bearing: the number at the direction of travel arrow is your bearing
Correct for declination: add or subtract your local declination value
Follow the bearing in the field:
Hold compass level in front of your body
Rotate your whole body until the red needle sits inside the "shed" (the bezel's North marks)
The direction of travel arrow points where you should walk
🎯 Triangulation — Finding Your Position
When you don't know your exact position, triangulation with two or three visible landmarks solves it:
Identify 2 recognisable landmarks in the terrain and on the map (peak, tower, river junction)
Take a bearing to each landmark with the compass
On the map: draw lines from each identified landmark in the opposite direction to the measured bearing
The intersection of the two lines is your position
With 3 landmarks, the triangle formed by the intersections shows your error margin — the smaller the triangle, the more accurate your position.
🎥 Watch: How to use compass and map — complete step by step:

☀️ PART 4 — Natural Navigation: Without Compass or Map
☀️ Sun Navigation
Shadow Stick Method — most accurate without equipment:
Plant a 1-metre vertical stick in flat ground
Mark the tip of the shadow with a stone or twig (Point A)
Wait 15 to 20 minutes
Mark the new shadow tip position (Point B)
The line from A to B points approximately East
Place your left foot on A and right foot on B — you are facing North
At midday:
Southern hemisphere: the midday sun is approximately due North
Northern hemisphere: the midday sun is approximately due South
⭐ Star Navigation
Southern Cross (Southern Hemisphere): The most reliable constellation for southern hemisphere navigation.
Identify the Southern Cross — four stars in a cross shape
Find the two Pointer Stars (Alpha and Beta Centauri) beside it
Extend the long axis of the Cross by 4.5 times its length
That imaginary point sits approximately above the Geographic South Pole
Draw a vertical line from that point to the horizon — that direction is South
Polaris / North Star (Northern Hemisphere): Polaris sits almost directly above the North Pole and barely moves.
Find the Big Dipper (Ursa Major)
The two stars forming the "outer edge" of the cup point directly to Polaris
Polaris indicates North with accuracy of less than 1°
By star movement: Watch any star for 15 to 20 minutes:
Rising → you are looking East
Setting → you are looking West
Moving right → you are looking South (Southern hemisphere)
Moving left → you are looking North (Southern hemisphere)
🌿 Natural Terrain Navigation Signals
Moss and vegetation: grows preferentially on damp, shaded faces. In the Northern hemisphere: tends to grow more on North-facing slopes. In the Southern hemisphere: tends to grow more on South-facing slopes. Less reliable in very wet environments.
Tree rings (cut stump): rings are wider on the side receiving more sun — South-facing in the Northern hemisphere, North-facing in the Southern.
Water as guide: rivers and streams always flow downhill. Following any watercourse downstream is one of the most reliable strategies for exiting remote areas.
Wind formations: sand dunes, leaning trees and accumulated snow always form in the direction of prevailing winds. If you know local winds, this can serve as consistent reference.
🎥 Watch: How to navigate without a compass using nature:

🔍 PART 5 — Estimating Distance and Speed
👣 Pace Count
Knowing how many paces you take to cover 100 metres lets you calculate distances without equipment.
How to calibrate:
Mark 100 metres on flat ground
Walk naturally counting only right-foot steps (double paces)
Repeat 3 times and average
For adults: typically 65 to 75 double paces per 100 metres
Factors that increase pace count: uphill slope, rough terrain or dense forest, carrying weight, night or low visibility.
⏱️ Naismith's Rule (Time Estimation)
Created by Scottish mountaineer William Naismith in 1892:
Base speed: 5 km/h on flat terrain
For ascent: +1 hour for every 600 metres of altitude gained
For rest stops: add 10 minutes per hour of walking
Example: a 12 km trail with 900 m of elevation gain:
12 km ÷ 5 km/h = 2h24min base
900 m ÷ 600 m = +1h30min for ascent
Estimated total: ~4 hours
📍 PART 6 — What to Do If You Get Lost: STOP Protocol
S — Stop: immediately stop walking. Every step could take you further from the correct route.
T — Think: when did you last know exactly where you were? What have you seen since then? Which direction did you travel?
O — Observe: look for visible landmarks — peaks, rivers, roads, towers. Compare with your map memory.
P — Plan: if possible, backtrack to the last known point. If not, choose a direction based on what you know and follow it consistently.
Additional strategies:
Climb to a high point for wider terrain view — landmarks invisible from ground level may become visible
Follow water downstream — in most cases, rivers lead to civilisation
Signal for rescue: stones in X or SOS pattern, signal mirror (visible up to 15 km in clear conditions), fire with dense white or black smoke
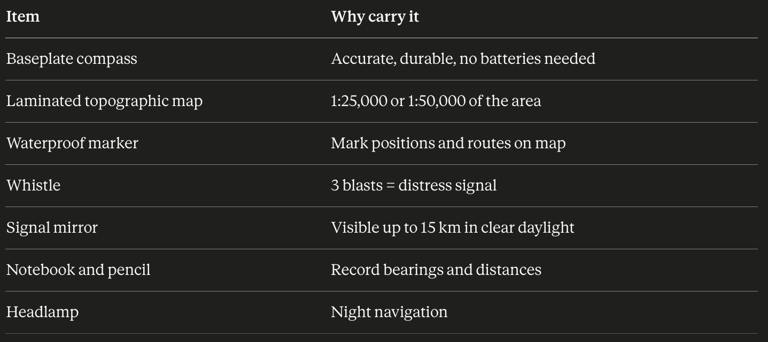
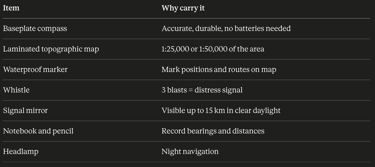
🎒 Essential Navigation Kit
🧭 Golden Rules of Navigation
Orient yourself before leaving — study the map at home, not on the trail
Confirm your position constantly — every 20 to 30 minutes, verify where you are
Trust the map over intuition — terrain that "feels right" rarely is
Record your position and time each time you change direction
The compass never lies — if the terrain looks wrong, you are probably wrong
Tell someone where you're going — and when you expect to return
🧭 Knowing where you are is knowing who you are in the world. Navigation isn't a technical skill — it's an act of trust between you and the terrain. Share this guide with everyone who loves to explore.
Contact
Contact us for questions or suggestions.
© 2025. All rights reserved.
suportedoisb@gmail.com