


Simple Agriculture: How to Plant, Grow and Harvest Your Own Food
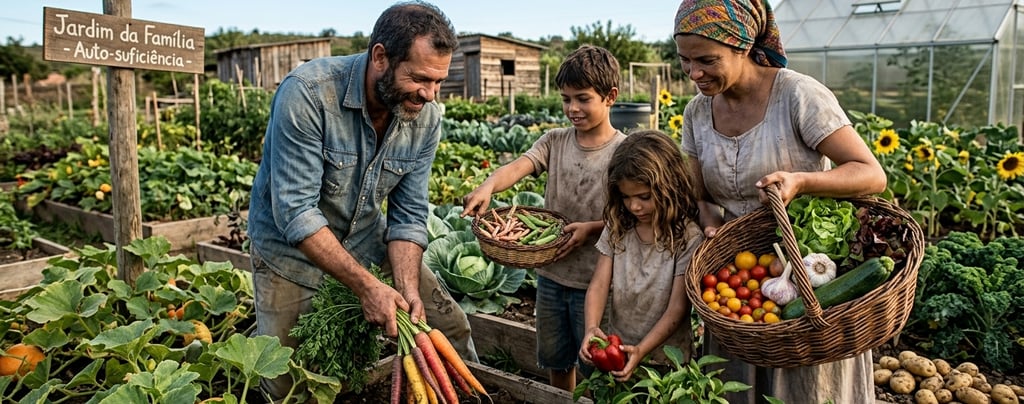
For millennia, every human family knew how to grow food. It was as fundamental a skill as cooking — as obvious as breathing. In just a few generations, that connection has been almost entirely lost. Most people today don't know where their food comes from, how it grows, or how to produce it if needed. The good news is that growing food is surprisingly simple. You don't need perfect fertile soil, expensive equipment or decades of experience. With basic knowledge, any space — a backyard, a balcony, a rooftop — can produce real, nutritious and abundant food. Keywords: how to start a vegetable garden, growing vegetables for beginners, survival agriculture, growing food in small spaces, easy organic garden
BARBARA COSTA
4/23/20265 min read


🌿 PART 1 — Soil Preparation
🧱 Soil Types and How to Improve Them
Clay soil (heavy, sticks to hands): retains too much water — root rot risk. Improvement: coarse sand + compost in 1:1:1 ratio.
Sandy soil (dry, doesn't hold shape): drains too quickly. Improvement: generous compost + clay.
Ideal soil — Loam: balanced, dark, loose, earthy smell, visible earthworms. Add only annual compost.
🪱 How to Make Compost (The Foundation of Everything)
Compost is the "brown gold" of farming — transforms waste into high-quality fertiliser and feeds the microorganisms that make nutrients available to plants.
✅ Greens (nitrogen): fruit and vegetable scraps, coffee grounds, eggshells, fresh grass clippings, green leaves
✅ Browns (carbon): dry cardboard, newspaper, dry leaves, straw, untreated sawdust
❌ Never add: meat, fish, dairy (attracts pests), diseased plants, carnivore droppings
Ideal ratio: 3 parts browns to 1 part greens
Process:
Start with a 10 cm layer of dry brown material
Add a 5 cm layer of green material
Moisten lightly (should feel like a gently squeezed sponge — damp but not wet)
Turn/mix every 1 to 2 weeks to oxygenate
In 60 to 90 days: compost ready — dark, moist, smelling of fresh earth
💧 Physical Soil Preparation
Raised bed (the most efficient for beginners): Ideal dimensions: 1.2 m wide × any length × 30 cm high. The 1.2 m width lets you reach the centre without stepping on the bed — critical for preventing compaction.
Layer filling:
Bottom: broken thick branches (drainage + slow decomposition = nutrients)
Middle: moistened cardboard layer (suppresses weeds)
Mix: 60% local soil + 30% compost + 10% coarse sand
Top: mulching (straw, wood chips) to retain moisture and suppress weeds
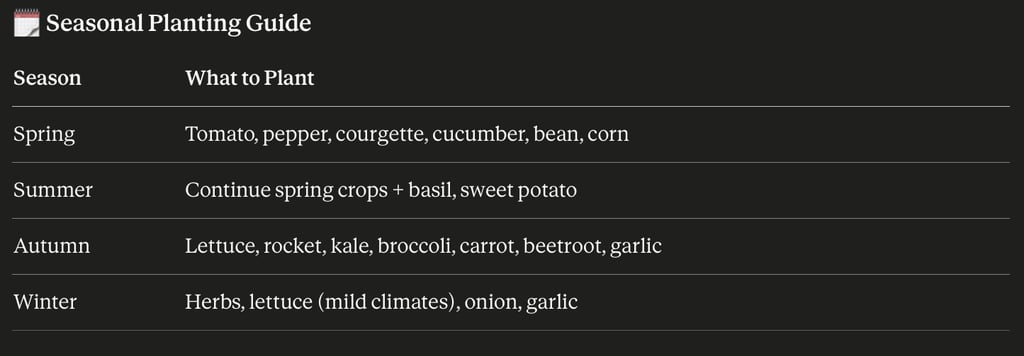
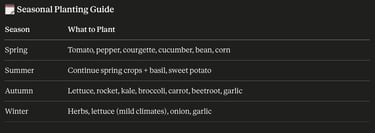
🌾 PART 2 — What to Plant: The 10 Best for Beginners
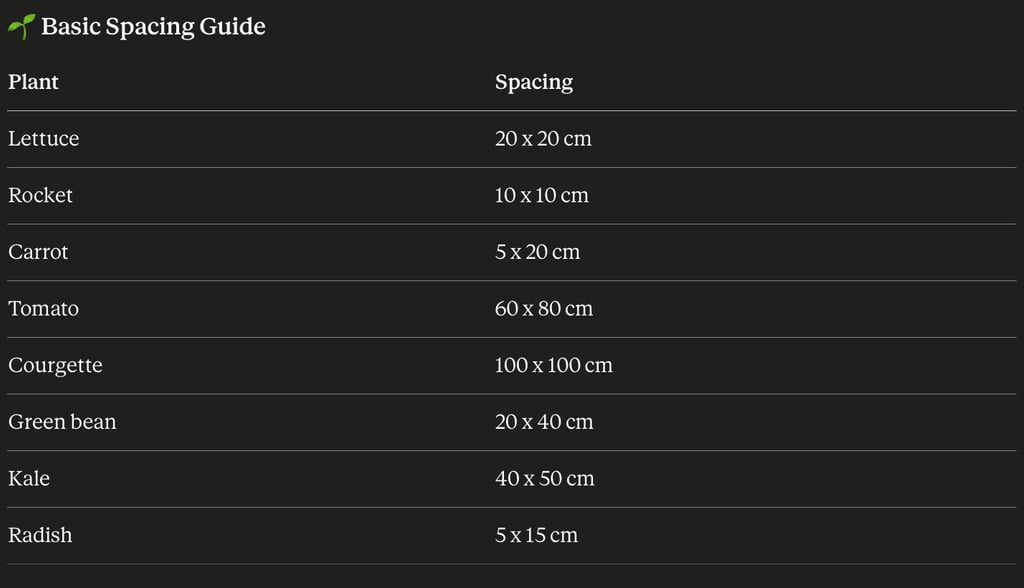
🥬 1. Lettuce (30–50 days): easiest of all. Tolerates partial shade. Leaf-by-leaf harvest — lasts months.
🫑 2. Rocket/Arugula (20–40 days): extremely fast. Germinates in 5–7 days. Rich in iron and vitamin C.
🥕 3. Radish (25–35 days): one of the fastest vegetables. Perfect for teaching children.
🧅 4. Spring Onion and Parsley (30–60 days): high-yield aromatics in small space. Virtually foolproof.
🥒 5. Courgette/Zucchini (50–70 days): extraordinary productivity — one healthy plant can produce 10–15 kg per season.
🍅 6. Cherry Tomato (60–80 days): simpler and more tolerant than regular tomato. High yield in pots or beds.
🫘 7. Green Bean (50–60 days): one of the easiest protein sources to grow. Fixes nitrogen in the soil.
🥦 8. Kale (60–90 days): extremely nutritious. Cold-resistant. Leaf-by-leaf harvest for months.
🌿 9. Basil (30–50 days): repels unwanted insects. Great planted next to tomatoes. Easy in pots.
🧄 10. Garlic (120–180 days): long wait but high value — antibacterial, universal seasoning, long shelf life. Plant in autumn for summer harvest.
🌱 PART 3 — How to Plant
🌰 Direct Seeding vs Transplanting
Direct seeding: carrot, beetroot, radish, bean, pea — plants that don't tolerate transplanting well. Make shallow furrows, plant 2–3 seeds per spot, thin to the strongest seedling.
Seed trays (for transplanting): tomato, pepper, broccoli, kale, lettuce. Transplant when seedlings have 4 to 6 leaves — soak the container in water first to ease removal.
💧 Correct Watering
The finger rule: insert your index finger to the second knuckle into the soil. If damp — don't water. If dry — water.
When to water: preferably early morning or late afternoon. Never at midday. Never wet the leaves of tomatoes or courgettes — promotes fungal disease.
🎥 Watch: How to start a vegetable garden from scratch:

🌿 PART 4 — Care and Maintenance
🐛 Pest Control Without Pesticides
Garlic and chilli spray: blend 5 garlic cloves + 2 chillies + 1 litre of water. Strain and dilute 1:10. Spray weekly as a preventive.
Diluted coconut soap: 2 tablespoons in 1 litre of water. Effective against aphids, mites and whitefly.
Companion plants that repel pests:
Basil next to tomatoes — repels whitefly
Marigolds around the bed — repels nematodes and insects
Garlic next to roses and vegetables — repels aphids and fungi
Mint at borders — repels ants and aphids (caution: invasive, plant in pots)
Physical controls:
Hand-picking caterpillars and slugs (early morning or at night)
Beer trap for slugs: pot buried at soil level filled with beer
Thick mulching: disrupts the life cycle of many pest insects
🌾 Maintenance Fertilisation
Compost: apply 2–3 cm on the surface every 4–6 weeks
Liquid compost (worm tea): dilute 1:10, apply at plant base every 2 weeks
Wood ash: rich in potassium and calcium, sprinkle around plants every 4 weeks
🎉 PART 5 — Harvest: How and When
⏰ How to Know the Right Time to Harvest
Tomato: harvest when 70–80% of the surface is red and the flesh yields gently to the touch.
Courgette/Zucchini: harvest at 15–20 cm — younger is more flavourful and the plant keeps producing.
Lettuce: harvest outer leaves at 10–15 cm. Harvest whole plant when it starts to bolt (flower).
Carrot: pull when the top of the root is visible at 1 cm diameter.
Green bean: harvest when pods are firm and full but before the beans inside visibly bulge.
Kale: harvest leaves from the bottom up — oldest first. Always leave at least 6 leaves per plant.
🏺 Basic Post-Harvest Storage
Root vegetables: store in dry sand inside boxes in a cool, dark place — last months
Leafy greens: wrap in damp paper and refrigerate. Consume within 5–7 days
Tomatoes: never refrigerate — loses flavour and texture. Room temperature until ripe
Herbs: hang upside down in an airy place to dry and preserve for months
Seeds for next planting: dry completely and store in paper envelopes inside sealed glass jars in a cool, dry, dark location
🎥 Watch: Harvesting and storing garden vegetables:

🌱 Survival Agriculture: Maximum Production in Minimum Space
For situations where space and resources are limited, these crops offer the highest caloric yield per square metre:
Sweet potato: one of the world's highest caloric yields per growing area. Resilient, productive and nutritious. Plant slips in any reasonable soil.
Cassava/Manioc: absurdly resilient — grows in poor soil, tolerates drought. High caloric productivity.
Pumpkin/Squash: extremely productive. One plant can cover 10 m² and produce 20–30 kg per season.
Corn + Bean + Squash (The Three Sisters): Indigenous intercropping system where all three crops benefit each other:
Corn creates support for beans to climb
Beans fix nitrogen in the soil for corn and squash
Squash covers the ground with its broad leaves — retains moisture and suppresses weeds
🧭 Golden Rules of Simple Agriculture
Start small — 2 m² well tended produces more than 20 m² poorly managed
Healthy soil is the only priority — everything else resolves with good soil
Observe your plants daily — problems identified early are easy to solve
Plant what you eat — the best garden is the one you actually use
Save seeds — real autonomy begins when you no longer depend on buying them
Failure is learning — every experienced gardener has killed plants. Keep planting
🌱 The earth never lies: what you plant, you harvest. Share this guide with everyone who wants more autonomy, health and connection to the origin of their food.
Contact
Contact us for questions or suggestions.
© 2025. All rights reserved.
suportedoisb@gmail.com